YouTube Channel Art and Banner: Size, Design and Setup Guide [2026]
Your YouTube banner is a billboard. Visitors land on your channel page and decide in under two seconds whether you look professional enough to deserve their subscription. A missing banner, a blurry background, or text that gets cut off on mobile all send the same signal: this creator doesn’t take their channel seriously.
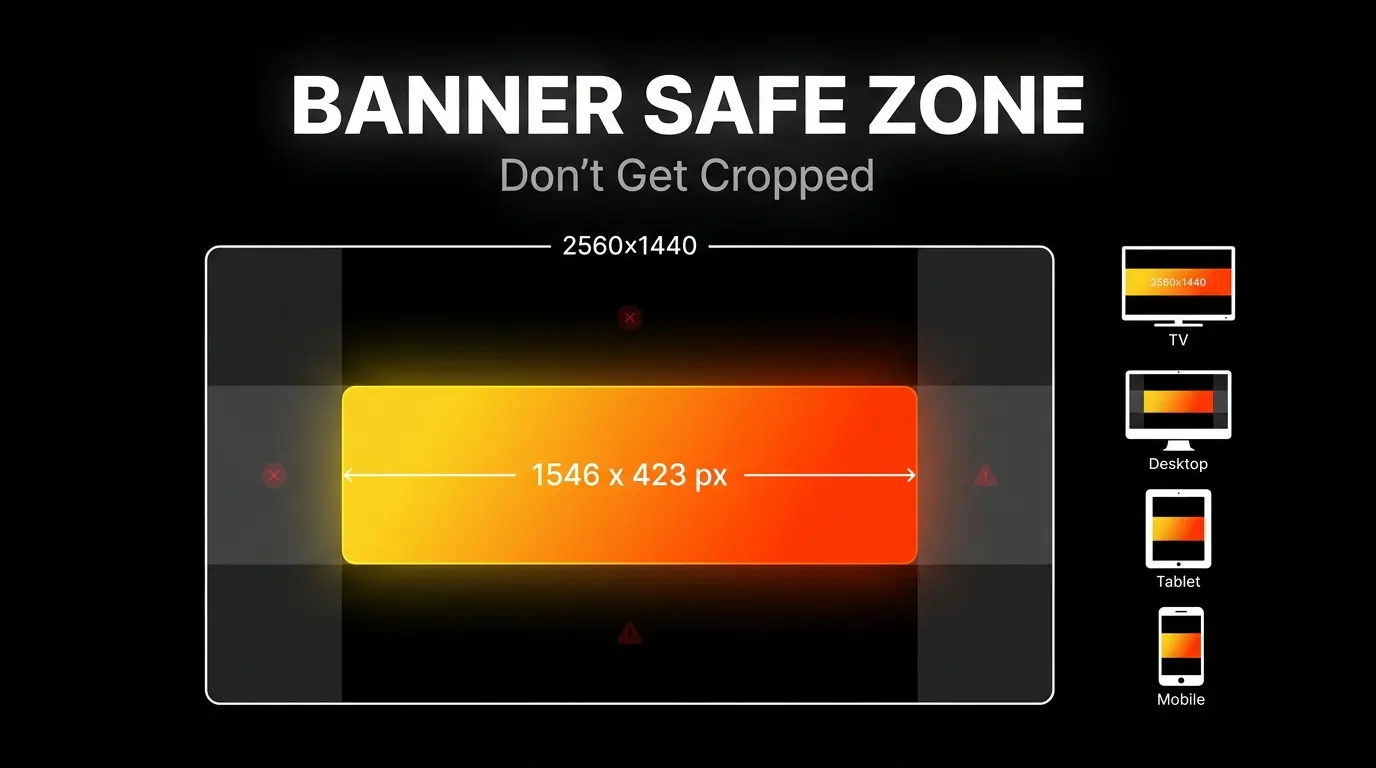
The problem is that YouTube displays your single banner image differently on every device — phone, desktop, tablet, and TV. One image file, four different crops. If you don’t design within the safe zone, your branding gets mutilated on the device most of your audience actually uses.
This guide gives you the exact dimensions, the safe zone rules, the best design tools, and the step-by-step upload process for 2026.
Building a channel from scratch? Start with our complete guide: How to Create a YouTube Channel.
YouTube Banner Dimensions: The 2026 Safe Zone
YouTube uses dynamic cropping — it doesn’t resize your image. It crops inward from the edges depending on the device. This means a single 2560 × 1440 px image gets sliced differently on every screen.
The Numbers You Need
| Device | Visible Area | What Happens |
|---|---|---|
| TV | 2560 × 1440 px | Full image displayed — the only device that shows everything |
| Desktop | 2560 × 423 px | Top and bottom cropped — only a horizontal strip remains |
| Tablet | 1855 × 423 px | Additional side cropping compared to desktop |
| Mobile (Safe Zone) | 1546 × 423 px | The tightest crop — only the center survives |
What This Means in Practice
The safe zone is a 1546 × 423 px rectangle centered in the middle of your 2560 × 1440 canvas. This is the only area guaranteed to be visible on every device.
Every critical element — your channel name, tagline, logo, face — must sit inside this zone. Anything outside it will be cropped on phones. And phones are where most viewers browse YouTube.
Recommended upload size: 2560 × 1440 px (the full canvas) Minimum accepted: 2048 × 1152 px Maximum file size: 6 MB Accepted formats: JPG, PNG, BMP, non-animated GIF
Pro tip: Use PNG for banners with text and logos (sharper edges). Use JPG (85%+ quality) for photo-heavy banners that might exceed the 6 MB limit.
RTL Layout Warning (Arabic Viewers)
If your audience uses YouTube in Arabic or other right-to-left languages, the interface mirrors. Your profile picture overlay moves from the bottom-left to the bottom-right corner of the banner. This means any text or logos placed in the bottom-right will be hidden under your profile picture for Arabic users.
Solution: Keep both bottom corners empty. Center all critical elements.
What to Include in Your Banner (and What to Skip)
Your banner has one job: tell new visitors what this channel is about and why they should subscribe. Treat it like a UI element, not a decoration.
Include These
1. Value Proposition (7–12 words max) One clear sentence that communicates what the viewer gets from subscribing. Written in bold, readable type inside the safe zone.
❌ A paragraph about your life story and channel philosophy ✅ “Practical YouTube growth strategies for new creators”
2. Upload Schedule “New videos every Tuesday” builds expectation and signals to both viewers and the algorithm that your channel is active and professional.
3. Brand Consistency Your banner colors, fonts, and style must match your thumbnails and profile picture. This creates instant recognition when your content appears in search results and the home feed.
4. Fill the TV Zones The areas above and below the safe zone show only on TVs. Don’t leave them blank — fill them with background gradients, patterns, or extended imagery that complements (but doesn’t distract from) the center content.
Skip These
| Don’t Include | Why |
|---|---|
| Social media handles | YouTube has a dedicated Links section for these |
| Long text paragraphs | Unreadable on mobile; causes information overload |
| Low-contrast text on complex backgrounds | Fails below the 4.5:1 contrast ratio minimum |
| Elements touching safe zone edges | They’ll get clipped; leave 60–80px padding inside the safe zone |
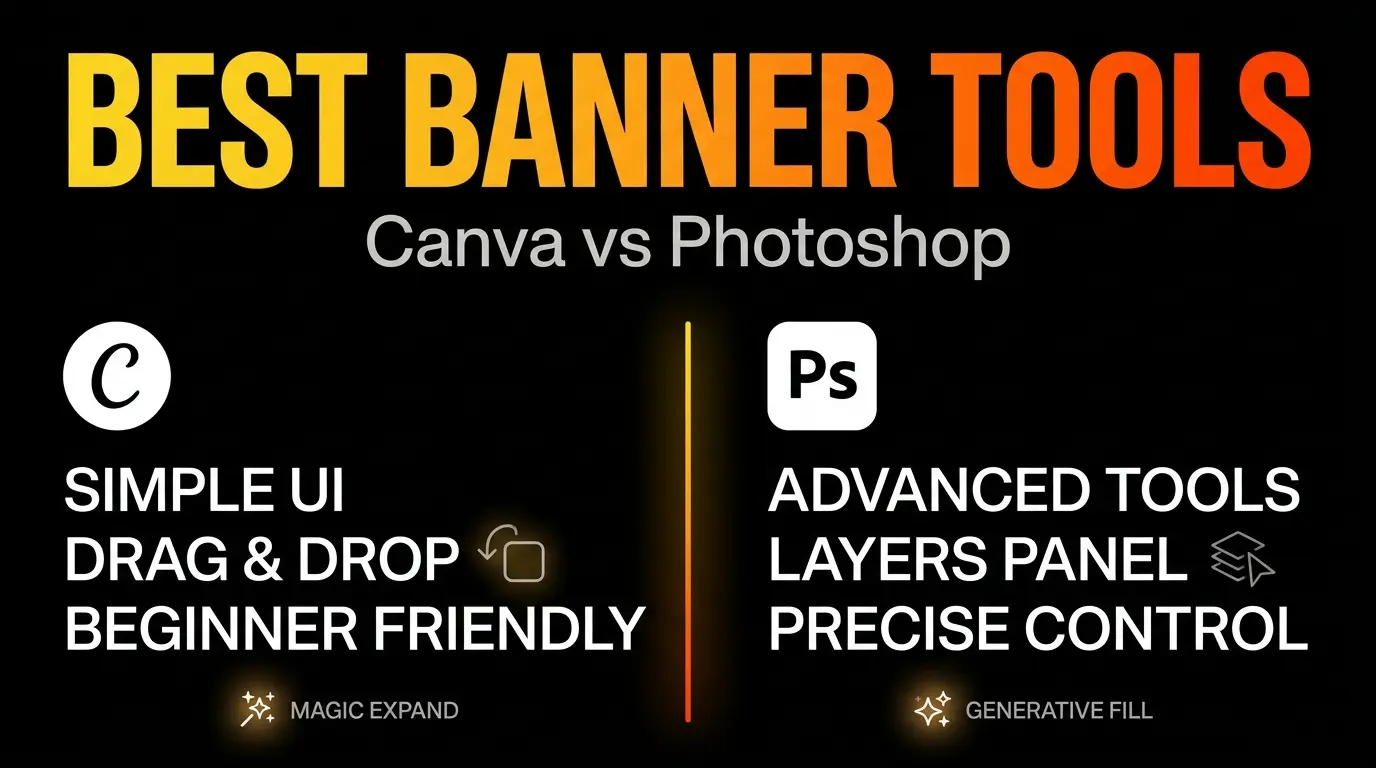
Free Tools to Design Your Banner
Canva (Recommended for Most Creators)
Canva is the fastest path to a professional banner — especially for beginners with no design background.
Why it works in 2026:
- Pre-sized templates: Search “YouTube Channel Art” and get thousands of templates already set at 2560 × 1440 px with safe zone guides built in.
- Magic Expand (AI): Have a great photo but wrong aspect ratio? The AI generates matching background pixels to fill the wide banner format seamlessly.
- Magic Layer (AI): Upload a flat photo and Canva separates the subject from the background into independent layers. Place text behind or in front of people without manual masking.
- Snap Guides: Drag-and-drop alignment lines keep your text locked inside the safe zone.
Photoshop (Advanced Control)
For creators who need pixel-perfect control, layer management, and professional export settings.
Setup workflow:
- Create canvas: 2560 × 1440 px, 72 PPI, sRGB color space.
- Build guide zones: Use rulers to draw guides marking the 1546 × 423 px safe zone centered in the canvas.
- Group critical layers: All text, logos, and faces go inside a folder locked to the safe zone boundaries.
- Generative Fill (AI): Select the empty TV zones (top/bottom) and let Photoshop’s AI generate matching background extensions with correct lighting and depth.
- Export: PNG-24 for crisp text edges, or JPG at 85%+ quality to stay under 6 MB.
How to Upload and Preview Your Banner
The upload process takes 60 seconds — but the preview step is where most mistakes get caught or missed.
Step-by-Step
- Open YouTube Studio → Left menu → Customization → Branding tab.
- Under “Banner image,” click Upload (new channels) or Change (existing channels).
- Select your exported banner file.
- YouTube’s Live Preview Tool appears — this is the critical step.
The Preview Is Non-Negotiable
The preview shows your banner with transparent overlays marking exactly how each device will crop the image. You’ll see:
- The full TV view
- The desktop strip
- The mobile crop (this is the one that matters most)
Check the mobile overlay carefully. If any letter of your tagline, any edge of your logo, or any part of a face falls outside the mobile boundary — stop. Go back to your design tool, push everything toward center, re-export, and re-upload.
Only click Publish when the mobile preview looks perfect.
2026 tip: YouTube Studio now includes “Ask Studio,” an AI assistant that can provide quick analytics on how your channel page changes affect visitor-to-subscriber conversion rates. After updating your banner, monitor this metric for 2 weeks.
Channel Logo and Watermark Setup
Your banner, profile picture, and video watermark work as a unified brand system. Skipping any one of them creates visual gaps.
Profile Picture (Channel Logo)
| Spec | Value |
|---|---|
| Upload size | 800 × 800 px (square) |
| Display shape | Circular (YouTube crops the corners) |
| Max file size | 15 MB |
| Display size in UI | ~98 × 98 px |
Design rules:
- Center your logo or face in the exact middle of the square — the four corners get cut.
- Avoid small text — it becomes unreadable at 98px display size.
- Use background colors that match your banner palette for brand consistency.
Video Watermark (Subscribe Button)
The watermark is a clickable subscribe button that floats in the bottom-right corner of every video. It’s a passive conversion tool that works 24/7.
| Spec | Value |
|---|---|
| Upload size | 150 × 150 px |
| Max file size | 1 MB |
| Best format | PNG with transparent background |
Setup: YouTube Studio → Customization → Branding → Video watermark → Upload.
Display timing options:
| Option | Best For |
|---|---|
| Entire video | Maximum exposure, builds continuous brand awareness |
| Custom start time | Start after 30 seconds to avoid distracting from the hook |
| End of video | Minimal disruption, but lowest conversion |
For maximum subscriber conversion, set it to Entire video with a transparent PNG of your logo or a simple “Subscribe” button design.
![]()
Common Banner Mistakes
1. The Floating Head Face or text placed outside the safe zone gets cropped on mobile. Half a head or a cut-off tagline screams “amateur.” Keep everything critical inside the 1546 × 423 px center.
2. Information Overload Your banner is a billboard, not a brochure. One message, one visual focus. Social links belong in the About section, not stamped across your banner.
3. Pixelated Images Starting with a low-resolution source image and stretching it to 2560px creates visible blur on TV displays. Always start with high-resolution assets. Use AI expand tools instead of manual stretching.
4. The Logo Eclipse YouTube overlays your profile picture on the bottom-left corner of the banner (bottom-right for Arabic/RTL users). Any text in those corners gets hidden. Leave both bottom corners empty.
5. Unreadable Text Light text on a light background, or text placed directly over complex photo details without a contrast overlay. Maintain a minimum 4.5:1 contrast ratio. Add a semi-transparent dark layer behind text if needed.
Your Banner Checklist
- Canvas: 2560 × 1440 px
- All critical content within 1546 × 423 px safe zone
- 60–80px padding inside safe zone edges
- Both bottom corners empty (for LTR + RTL compatibility)
- Text contrast ratio ≥ 4.5:1
- File under 6 MB (PNG or JPG 85%+)
- Previewed on YouTube’s mobile overlay before publishing
- Profile picture uploaded (800 × 800 px)
- Video watermark configured (150 × 150 px transparent PNG)
- Colors/fonts match thumbnail style
Banner done? Time to write the text that converts visitors into subscribers. Next: How to Write a YouTube Channel Description That Ranks.
Want to study how top creators design their banners? Download any channel’s banner in full resolution with our free YouTube Banner Downloader.
![Your First 10 YouTube Videos: What to Post [2026]](/images/growth/first-youtube-videos/first-videos-plan.webp)
![How Long Does It Take to Get 1000 YouTube Subscribers? [2026 Data]](/images/growth/how-long-to-get-1000-subscribers/1000-subscribers.webp)