How to Create a YouTube Channel: Complete Beginner’s Guide [2026]
Creating a YouTube channel takes less than five minutes. Building one that actually gets discovered takes a system. Most beginners rush through the setup, skip the branding, ignore the settings — and wonder six months later why zero people found their content. The difference between a dead channel and a growing one almost always traces back to what happened in the first 48 hours.
This guide walks you through every step of creating a YouTube channel in 2026 — from the Google account setup to publishing your first video. No fluff, no filler. Each step includes the exact settings, the reasoning behind them, and the mistakes that silently kill new channels before they ever get a chance.
Ready to build something real? Here’s the exact sequence:

1. Before You Create: What You Need to Decide First
Most failed channels share the same origin story: someone clicked “Create Channel” before answering three critical questions. YouTube’s algorithm doesn’t care how polished your first video is — it cares whether your channel sends clear signals about what it’s about and who it’s for.
Before you touch YouTube, lock these down:
Define Your Niche (Be Specific)
“Tech” is not a niche. “Budget phone reviews under $300” is a niche. The tighter your focus, the faster YouTube understands your channel and starts recommending your content to the right viewers.
Ask yourself:
- What topic could you make 50 videos about without running out of ideas?
- Who is your viewer? Age, skill level, problem they’re trying to solve.
- What format will you use? Tutorials, vlogs, reviews, shorts, or a mix.
Set a Realistic Upload Goal
Don’t promise “daily uploads” if you have a full-time job. YouTube rewards consistency over frequency. Two well-edited videos per week beat seven rushed ones every time.
| Upload Frequency | Best For | Algorithm Impact |
|---|---|---|
| 1 video/week | Most new creators | Steady, sustainable growth |
| 2 videos/week | Creators with production systems | Faster data, faster learning |
| 3+ videos/week | Full-time creators or Shorts-heavy channels | High output but risk of burnout |
Here’s the thing:
You can always change your niche later — but starting with a clear direction gives the algorithm a head start on categorizing your channel.
2. Create Your Google Account and YouTube Channel
Every YouTube channel lives under a Google Account. If you already have a Gmail address, you’re halfway there. If not, create one now — it takes 60 seconds.
Option A: Use Your Existing Google Account
- Go to youtube.com and sign in with your Google Account.
- Click your profile icon (top right) → Create a channel.
- YouTube asks for a channel name and handle — enter them (we’ll cover naming strategy in the next section).
- Click Create Channel. Done.
Option B: Create a Brand Account (Recommended)
A Brand Account lets multiple people manage the channel without sharing personal login credentials. Even if you’re solo right now, this gives you flexibility later.
- Sign in to YouTube → Click your profile icon → Settings.
- Under “Your channel,” click Add or manage your channels.
- Click Create a channel → Enter your channel name.
- YouTube automatically creates a Brand Account tied to your personal Google Account.
Why Brand Account matters: If you ever hire an editor, a manager, or sell the channel — you can transfer ownership cleanly. Personal channels can’t do this.
Pro tip: Never use your real full name as the channel name unless you’re building a personal brand intentionally. Once set, changing it affects your branding across every video.
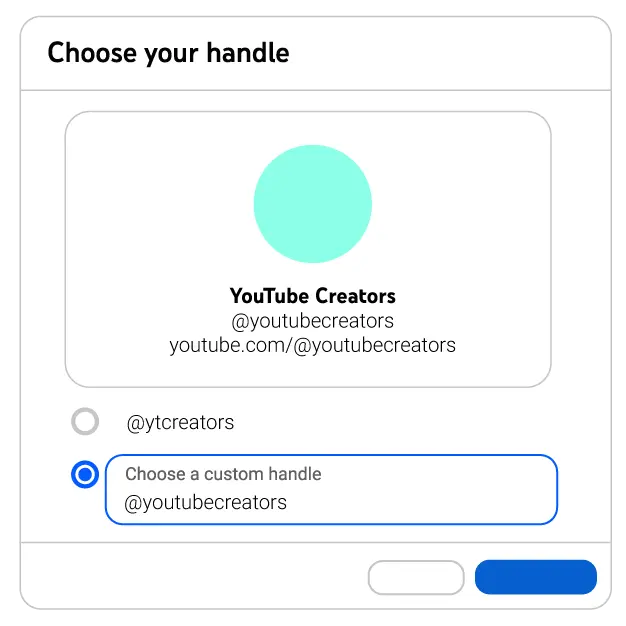
3. Choose Your Channel Name and Handle
Your channel name is the first thing viewers read. Your handle (@yourusername) is how people find and mention you. Both matter for discovery, but for very different reasons.
The Channel Name
This appears on every video, search result, and recommendation card. It should be:
- Memorable — easy to spell, easy to say out loud
- Relevant — gives a hint about your content
- Unique — not already taken by a larger channel in your niche
Five proven naming formulas:
- Your real name — Best for personal brands (e.g., “Ali Abdaal”)
- Niche + modifier — Descriptive and searchable (e.g., “Tech Simply”)
- Invented word — Unique and brandable (e.g., “Touhfa”)
- What you teach — Direct and clear (e.g., “Design Tutorials”)
- Acronym — Short and punchy (works best with an existing audience)
The Handle (@username)
Your handle appears in URLs, comments, and Shorts. Choose one that:
- Matches your channel name as closely as possible
- Contains no numbers or random characters
- Is easy to type on mobile keyboards
Need help brainstorming? Try our free YouTube Username Generator — it checks availability instantly.
For a deeper dive on naming psychology and the 7 mistakes that make names forgettable, read our complete guide: How to Choose a YouTube Channel Name That Works.
4. Set Up Your Channel Art and Branding
First impressions on YouTube are visual. A channel with no banner, no logo, and a default profile photo screams “this person isn’t serious.” Viewers make that judgment in under two seconds.
Channel Banner (Header Image)
This is the large image at the top of your channel page. YouTube displays it differently on desktop, mobile, and TV — so you need to design within the safe zone.
| Device | Visible Area |
|---|---|
| Desktop | 2560 × 423 px (center crop) |
| Mobile | 1546 × 423 px (tighter center crop) |
| TV | 2560 × 1440 px (full image) |
The safe zone where text and logos must stay: 1546 × 423 px centered in the middle of a 2560 × 1440 px canvas.
What to include in your banner:
- Your channel name or tagline
- Upload schedule (e.g., “New videos every Tuesday”)
- A visual hint about your niche
What to skip: Social media handles (they’re clickable in the About section), cluttered text, or low-resolution photos.
Tools: Canva (free, has YouTube banner templates) or Photoshop (full control over safe zones).
Want to check how top creators design their banners? Use our YouTube Banner Downloader to grab and study any channel’s banner in full resolution.
For complete banner specs, templates, and common mistakes, see our full guide: YouTube Banner Size and Design Guide.
Profile Picture (Channel Logo)
- Upload at 800 × 800 px minimum
- Use a clear logo or high-contrast headshot
- Avoid text — it becomes unreadable at small sizes
Video Watermark
This is the small subscribe button that appears in the corner of your videos.
- Go to YouTube Studio → Customization → Branding.
- Upload a 150 × 150 px transparent PNG of your logo.
- Set it to appear at the End of video or Entire video.
5. Write Your Channel Description
Your channel description (the “About” section) serves two masters: human viewers deciding whether to subscribe, and YouTube’s algorithm trying to categorize your content.
The 3-Part Formula
Line 1 — Who you are and what you do: State your value proposition in one sentence. Front-load keywords naturally.
❌ “Hey! Welcome to my channel! I love making videos about stuff.” ✅ “Practical thumbnail design tutorials and YouTube growth strategies for creators who want more clicks.”
Lines 2–3 — Your content promise: Tell the viewer what to expect and when.
“New tutorials every Tuesday. Shorts every Friday. Subscribe to level up your YouTube game.”
Line 4+ — Links and contact: Add your business email, social links, and any collaboration inquiries.
Keyword tip: YouTube reads your channel description for topic signals. Use your main keywords naturally — don’t stuff them. If your niche is “thumbnail design,” make sure that phrase appears at least once in the first two lines.
For three copy-paste description templates you can customize, read: How to Write a YouTube Channel Description That Ranks.
6. Configure Essential Channel Settings
Most beginners skip YouTube Studio settings entirely. That’s a mistake — these defaults affect every video you upload from this point forward, and some features stay locked until you complete specific steps.
Settings You Must Change on Day 1
Go to YouTube Studio → Settings (gear icon, bottom left):
General:
- Set your Country (affects monetization eligibility and content regulations)
- Set your Currency (for future revenue reporting)
Channel → Basic info:
- Add Channel Keywords — 5 to 7 terms that describe your overall channel topic. These are not video tags; they help YouTube understand your channel at a macro level.
Upload Defaults: This is the power setting most creators ignore. Everything you set here auto-fills for every future upload:
- Default Title template (optional)
- Default Description (add your social links, channel link, standard disclaimer)
- Default Tags (your core 5 recurring tags)
- Default Visibility (set to “Private” so you never accidentally publish a half-finished video)
Phone Verification (Critical)
Without phone verification, you cannot:
- Upload videos longer than 15 minutes
- Create custom thumbnails
- Go live
- Appeal Content ID claims
Go to youtube.com/verify and complete this in the first 10 minutes of channel creation. There is no reason to delay.
Custom URL
You can claim a custom URL (e.g., youtube.com/@yourusername) once you meet YouTube’s eligibility requirements:
- At least 30 days old
- A profile picture
- A banner image
For the full settings walkthrough including Feature Eligibility, notification control, and community tab access, read: YouTube Channel Settings Every Beginner Must Configure.
7. Plan Your First 10 Videos
This is where most new creators stall. The channel is set up, the branding looks good, the settings are dialed in — and then… nothing. The blank content calendar becomes a wall.
Here’s the framework that works:
The 3-Bucket Strategy
Every successful channel mixes three types of content:
Bucket 1 — Searchable Content (60% of your first 10) Tutorials, how-to’s, and answers to specific questions people actually search for. These videos get discovered through YouTube Search and build your foundation.
Example: “How to Remove Background in Photoshop” or “Best Camera Settings for YouTube”
Bucket 2 — Trending/Reactive Content (20%) Videos tied to current events, new tool releases, or trending discussions in your niche. These have a short shelf life but can spike your channel visibility.
Example: “YouTube’s New AI Feature — What It Means for Creators”
Bucket 3 — Personal/Story Content (20%) Videos that show your personality, share your journey, or explain why you started your channel. These convert casual viewers into loyal subscribers.
Example: “Why I’m Starting a YouTube Channel in 2026”
A Starter Content Plan
| Video # | Type | Example Topic |
|---|---|---|
| 1 | Searchable | How to [solve common problem in your niche] |
| 2 | Searchable | Top 5 [tools/resources] for [niche] beginners |
| 3 | Personal | Why I’m starting this channel (intro video) |
| 4 | Searchable | [Niche] mistakes beginners make |
| 5 | Searchable | How to [specific technique] step by step |
| 6 | Trending | My reaction to [recent niche news/tool release] |
| 7 | Searchable | [Niche] for beginners: where to start |
| 8 | Searchable | [Tool/software] tutorial for [niche] |
| 9 | Personal | My [niche] setup tour / workflow |
| 10 | Searchable | [Advanced technique] explained simply |
Don’t wait until all 10 are scripted. Record video #1 this week. The only way to learn YouTube is by publishing.
For the complete content planning framework with upload frequency data, topic research methods, and the #1 mistake that wastes your first month, read: Your First 10 YouTube Videos: What to Post.
8. Upload Your First Video the Right Way
Your channel is ready. Your content plan exists. Now it’s time to upload — and this is where details matter more than you think.
The upload process in 2026 has more settings than ever before: AI disclosure, altered content declarations, ad suitability self-certification, and chapter markers. Missing any of these can limit your video’s reach or trigger manual reviews.
We’ve written the definitive guide to every upload setting, tab by tab, field by field. Before you hit that upload button, read: How to Upload Videos to YouTube the Right Way.
The short version:
- Prepare all assets before uploading — title, description, tags, thumbnail, end screen links.
- Upload as Unlisted first — let YouTube finish processing in HD before going public.
- Schedule the publish time — pick a slot when your target audience is active.
- Never hit “Public” while the video is still processing in SD.
For mobile-specific uploads, check: Upload YouTube Videos from Phone.
9. Common Mistakes That Kill New Channels
After analyzing hundreds of failed channels, the same patterns repeat. Avoid these and you’re already ahead of 80% of new creators:
Mistake 1: No Custom Thumbnail
YouTube auto-generates a random frame from your video as the default thumbnail. It’s almost always terrible. Custom thumbnails get significantly higher click-through rates — and you can’t upload them until you verify your phone number (Step 6).
Mistake 2: Generic Channel Name and Zero Branding
A channel called “John’s Videos” with no banner and a pixelated profile photo tells potential subscribers one thing: this person will probably quit in two weeks.
Mistake 3: Uploading Without a Title Strategy
Writing your title after recording is backwards. The title should shape the video, not the other way around. Searchable titles outperform clever ones for new channels with zero audience.
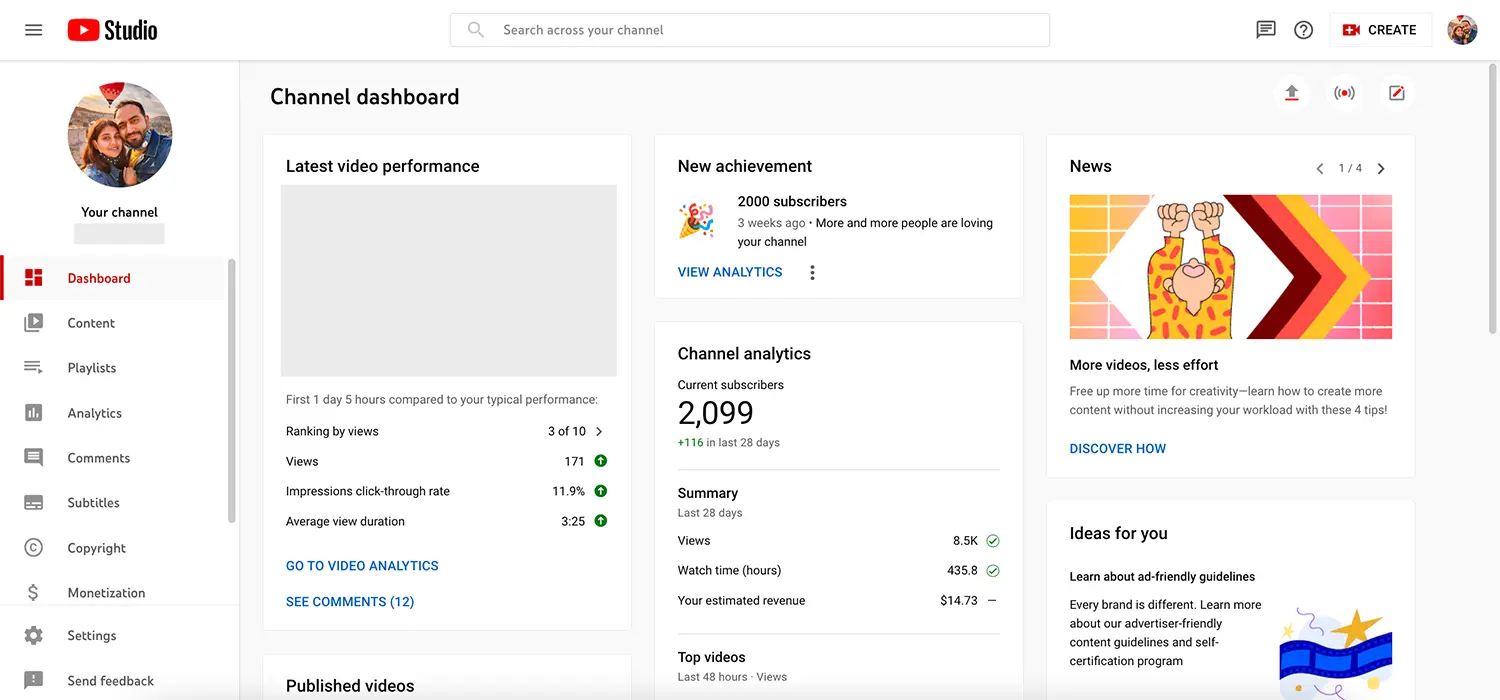
Mistake 4: Ignoring YouTube Studio Analytics
After your first video, YouTube gives you data: impressions, click-through rate, average view duration. Most beginners never check. These numbers tell you exactly what to fix in video #2.
Mistake 5: Comparing Yourself to Channels With 5 Years of History
Your first video will not get 100,000 views. It might get 12. That’s normal. YouTube needs 10 to 15 videos to understand your channel and start recommending it. The creators who succeed are the ones who keep publishing past video #10.
10. What Happens After Your First Upload
You published your first video. Now what?
The first 48 hours are the testing window. YouTube shows your video to a small sample audience and measures:
- Click-through rate (CTR): Are people clicking your thumbnail?
- Average view duration (AVD): Are they watching or bouncing after 10 seconds?
- Engagement: Likes, comments, shares.
If these signals are positive, YouTube pushes the video to a wider audience. If not, the video stops getting impressions.
What to do in week 1 after publishing:
- Check YouTube Studio → Analytics daily. Watch for CTR (aim for 4%+ on a new channel) and AVD (aim for 40%+ of total video length).
- Reply to every comment. Early engagement signals matter, and building relationships creates loyal subscribers.
- Share the video in one or two relevant communities (Reddit, Discord, Facebook Groups). Don’t spam — add genuine value.
- Start recording video #2. Momentum matters more than perfection.
Realistic expectations for a brand new channel:
| Metric | First Video | After 10 Videos | After 30 Videos |
|---|---|---|---|
| Views | 10–100 | 50–500 per video | 200–2,000+ per video |
| Subscribers | 0–5 | 20–100 | 100–500+ |
| Search impressions | Low | Growing | Consistent |
These numbers assume consistent uploads, decent thumbnails, and searchable topics. Viral outliers exist, but building on systems beats hoping for luck.
Your Channel Creation Checklist
Before you close this guide, confirm every step is done:
- Niche and content direction defined
- Google Account ready (or Brand Account created)
- Channel name and handle set
- Banner uploaded (safe zone design, 2560 × 1440 px)
- Profile picture uploaded (800 × 800 px minimum)
- Video watermark configured
- Channel description written with keywords
- Country, currency, and channel keywords set
- Upload defaults configured (description + tags + visibility)
- Phone verification completed
- First 10 video topics planned
- Video #1 recorded and uploaded
Every step in this checklist links to a deeper guide. Bookmark this page and work through them one at a time.
The channel is built. The settings are right. Now the only thing left is to create.
![Your First 10 YouTube Videos: What to Post [2026]](/images/growth/first-youtube-videos/first-videos-plan.webp)
![How Long Does It Take to Get 1000 YouTube Subscribers? [2026 Data]](/images/growth/how-long-to-get-1000-subscribers/1000-subscribers.webp)