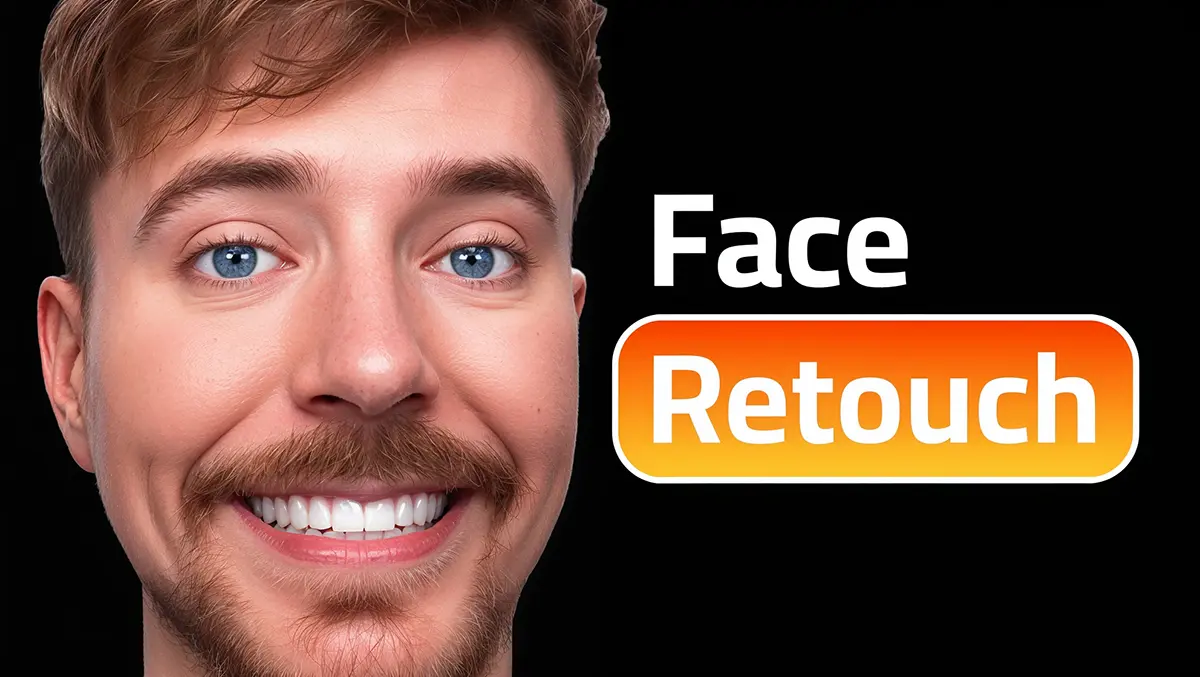
MrBeast Face Effect: Photoshop Retouching Tutorial for Thumbnails
Every MrBeast thumbnail shares one secret weapon: the face sells the click. The skin is impossibly smooth, the eyes glow, the teeth are pure white, and the whole face has that “cartoonish yet hyper-real” quality that pops on every screen size.
This isn’t random. It’s a precise 6-step retouching workflow that his design team uses on every single thumbnail. And in this guide, you’ll learn exactly how to recreate it - step by step - plus we’re giving you a completely free Photoshop Action Bundle as a gift that automates the entire setup. No strings attached.
Before diving in, make sure you’ve read the parent guide: MrBeast Thumbnail Secrets: The $100M Design Formula - it covers the full design philosophy, color codes, fonts, and psychology behind every MrBeast thumbnail.
What Makes the MrBeast Face Different?
Before touching Photoshop, let’s analyze what exactly makes a MrBeast face look the way it does. If you study his thumbnails closely, you’ll notice these consistent traits:
| Feature | What You See | Why It Works |
|---|---|---|
| Skin | Extremely smooth, no pores or blemishes visible | Reduces visual noise, face reads instantly at 156x88px (mobile) |
| Eyes | Sclera is pure white, iris is bright and sharp | Eyes are the first thing the brain processes - brighter = more engaging |
| Teeth | 100% white, no yellow tones | Signals health, energy, and excitement |
| Contrast | Strong separation between skin and facial hair | Creates definition that survives extreme downscaling |
| Skin Tone | Shifted towards warm orange/pink, never pale | Warm tones signal approachability and vitality |
| Edge Highlight | Subtle white rim light on face edges | Separates face from any background - the “sticker” effect |
The workflow below recreates every single one of these traits.
Beyond the retouching technique, the expression itself is a key variable. MrBeast’s team selects photos that show one of three high-performing expressions: the surprised face (wide eyes, open mouth - used for shock/giveaway thumbnails), the sigma face (intense direct stare, slight frown - used for challenge and competition thumbnails), and the shocked face (exaggerated disbelief - used for record-breaking or unexpected outcome thumbnails). The retouching workflow in this guide applies to all three. The expression is chosen before editing; the technique is the same.
🎁 Free Gift: Touhfa Photoshop Action Bundle
Before we start, here’s our gift to you: the Touhfa Photoshop Action Bundle - a 100% free professional action set that instantly creates all the adjustment layers you need for MrBeast-level face retouching. This is the same workflow used by top thumbnail designers, packaged into one-click actions.
This is not a trial. Not a limited version. It’s the full bundle, completely free.
 The Touhfa Action Bundle inside Photoshop’s Actions panel - every face retouching tool in one place
What’s Inside the Bundle
| Action | What It Does | Step It Covers |
|---|---|---|
| Touhfa FS 16bit / 8bit | Creates Frequency Separation layers | Step 2: Skin Smoothing |
| Touhfa Dodge and Burn | Sets up two Curves layers (brighten + darken) with inverted masks | Step 3: Dodge & Burn |
| Eyes & Teeth Whitening | Creates Hue/Saturation + Curves layers for whitening | Step 4: Eyes & Teeth |
| Color Correction | Adds Selective Color + Color Balance layers | Step 5: Skin Tone |
| Sharpen | Applies intelligent sharpening to detail areas | Step 6: Final Polish |
| Noise | Reduces sensor noise while preserving edges | Step 2: Support |
| Rich Tone | Adds depth through tonal adjustments | Step 5: Support |
| Unsharpen Face Mask | Selective face softening without affecting hair/eyes | Step 2: Support |
| Unsharpen Eyes and Lips Mask | Detail preservation for critical features | Step 6: Support |
How to Install
- Download the
Touhfa-Photoshop-Action-Bundle.atnfile using the button below - Open Photoshop
- Go to Window > Actions (or press
Alt + F9) - Click the hamburger menu (three lines) in the Actions panel
- Select Load Actions
- Navigate to the downloaded
.atnfile and click Load - You’ll see “Touhfa Action” appear in your Actions panel
[!TIP] This action bundle saves 15-20 minutes per edit by automatically creating all the adjustment layers with proper blending modes and masks. Instead of manually building 12+ layers, you click one button and start painting.
Download the Touhfa Action Bundle - Free
The 6-Step MrBeast Face Workflow
Step 1: Remove Background & Brighten (Camera Raw)
Goal: Clean extraction + flat, even base lighting
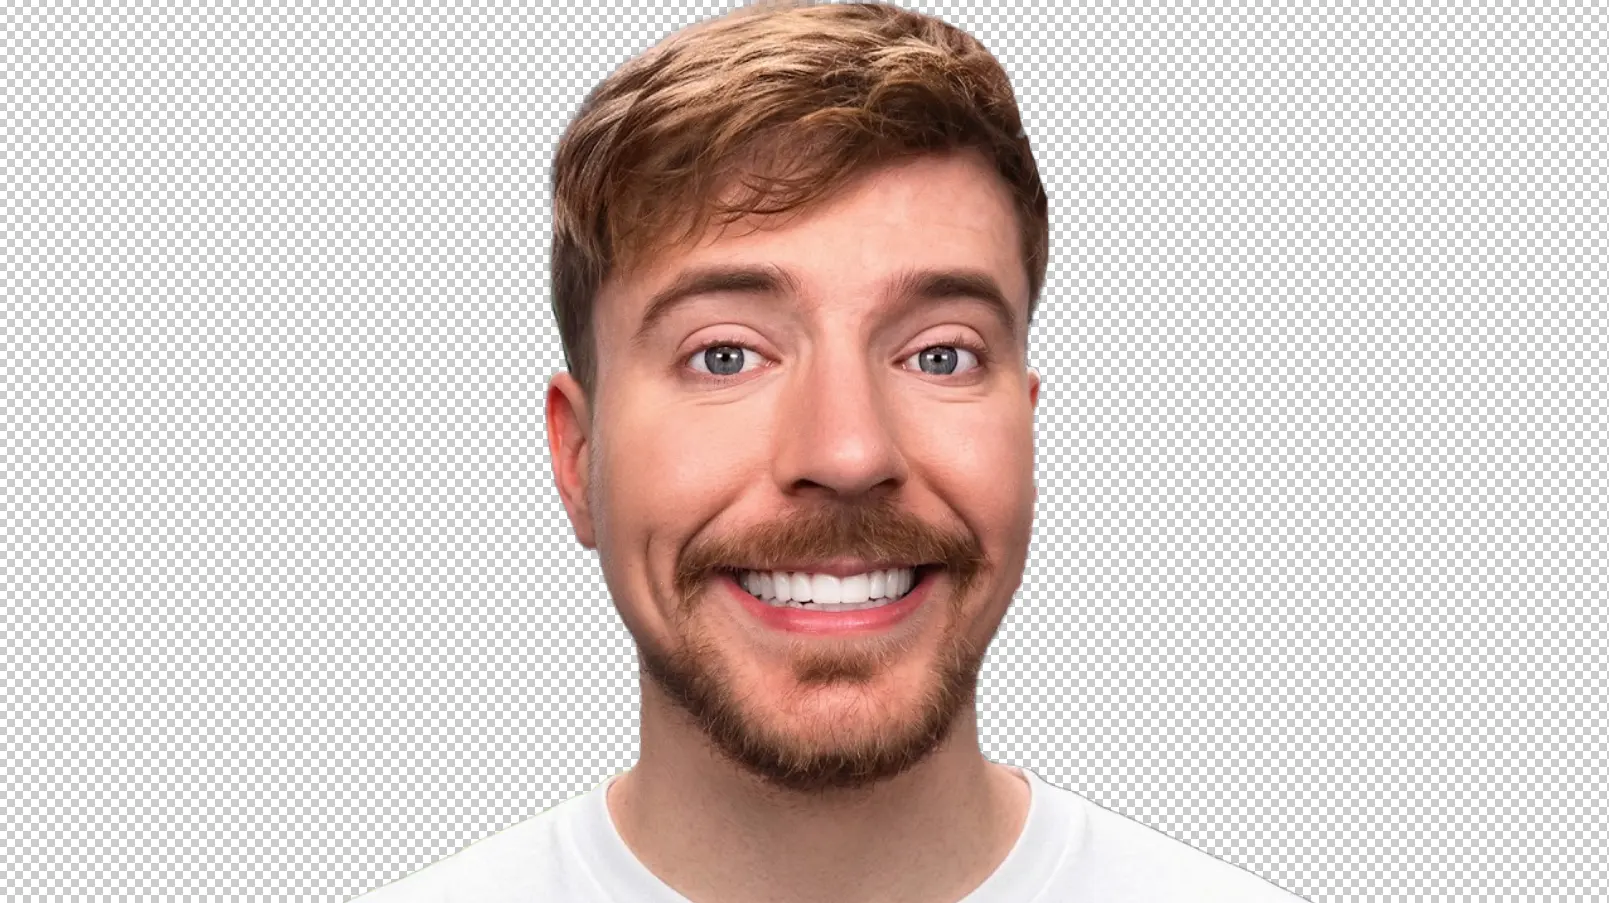 Step 1: Remove the background and brighten the face with Camera Raw settings
1.1 Remove the Background
Start by extracting your subject from the background:
- Use Object Selection Tool (W) or Select Subject in Photoshop 2026
- Refine edges around hair using Select and Mask workspace
- Output as a New Layer with Layer Mask
[!IMPORTANT] MrBeast thumbnails always use cutout subjects placed on designed backgrounds. Never use the original photo background - it adds visual noise that kills readability at mobile size.
1.2 Camera Raw Lighting Pass
With the cutout selected, go to Filter > Camera Raw Filter and apply these adjustments:
| Slider | Value | Why |
|---|---|---|
| Exposure | +0.3 to +0.5 | Lifts overall brightness |
| Contrast | -20 to -30 | Flattens lighting for even base |
| Highlights | +10 to +20 | Opens up bright areas |
| Shadows | +40 to +60 | Eliminates harsh shadows on face |
| Whites | +10 | Extends tonal range |
| Blacks | +15 | Lifts crushed shadows |
| Texture | +5 to +10 | Slight detail enhancement |
| Clarity | -10 to -15 | Softens micro-contrast (skin prep) |
| Dehaze | +10 to +16 | Adds “pop” and depth |
| Vibrance | +15 to +25 | Boosts dull colors without over-saturating |
[!WARNING] These values are starting points, not fixed rules. Every photo is different. Brightly lit photos may need lower Exposure (+0.1 or even 0) and less Shadow recovery. Dark or underexposed photos may need Exposure pushed to +0.8 or higher. The goal is always the same - even, flat lighting - but the sliders to get there depend entirely on your specific source image. Experiment, undo, and adjust until the face looks evenly lit with no harsh shadows.
1.3 Camera Raw Color Grading
Still inside Camera Raw, go to the Color Mixer tab:
| Channel | Hue Shift | Saturation | Luminance |
|---|---|---|---|
| Red | 0 | +10 | +5 |
| Orange (skin) | -5 (slightly warmer) | +10 | +10 |
| Yellow | +10 (towards green) | -5 | +5 |
| Magenta | +20 (towards red) | -10 | 0 |
Then in Color Grading:
- Midtones: Shift slightly towards yellow/orange
- Shadows: Shift towards cyan (creates depth)
- Highlights: Shift towards warm orange
Before/After: The image should look brighter, more even, and slightly warm - but still “washed out.” That’s intentional. We’re building a clean foundation.
Step 2: Skin Smoothing (Frequency Separation + Noise Reduction)
Goal: Glass-smooth skin while keeping edges sharp
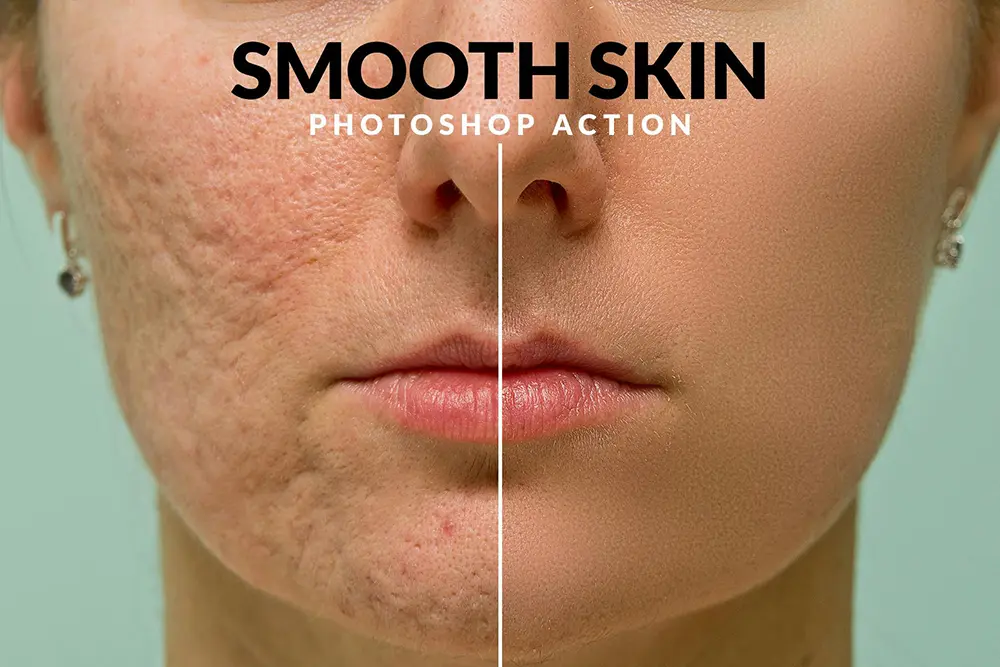 Step 2: Frequency Separation removes skin texture while preserving edges
This is where the face transforms from “photo” to “MrBeast.” The trick is removing skin texture without making it look plastic.
2.1 Run the Touhfa FS Action
In the Actions panel, expand “Touhfa Action” and click Play on “Touhfa FS 16bit” (or 8bit for smaller files). This automatically:
- Duplicates your layer
- Creates a High Frequency layer (texture/detail)
- Creates a Low Frequency layer (color/tone)
- Sets proper blending modes
2.2 Manual Method (Without the Action)
If working manually:
- Duplicate the subject layer twice
- Name the bottom copy “Low Frequency” and the top “High Frequency”
- On the Low Frequency layer: Filter > Blur > Gaussian Blur at 6-10px radius
- On the High Frequency layer: Image > Apply Image with these settings:
- Layer: Low Frequency
- Blending: Subtract
- Scale: 2, Offset: 128
- Set the High Frequency blending mode to Linear Light
2.3 Smooth the Skin
On the Low Frequency layer, use a soft brush (Hardness: 0%, Flow: 15-25%) to paint over skin areas:
Paint over:
- Forehead
- Cheeks
- Nose bridge
- Chin
- Neck
Avoid completely:
- Eyes and eyelashes
- Eyebrows
- Lips and mouth
- Hairline and facial hair
- Nostrils
2.4 Additional Smoothing Pass
For the classic MrBeast “cartoon clean” look, add one more pass:
- Select all layers, duplicate merged (
Ctrl + Alt + Shift + E) - Convert to Smart Object
- Filter > Camera Raw Filter:
- Texture: -30 to -50
- Noise Reduction: 40-65
- Color Noise Reduction: 5-10
- Create a mask, invert it (Ctrl + I)
- Paint with white brush (Flow: 50-75%) over skin areas only
[!WARNING] The Camera Raw values above are approximate ranges, not copy-paste numbers. A high-resolution studio portrait with fine skin detail may need gentler Texture reduction (-20 to -30), while a noisy phone camera shot may require aggressive Noise Reduction (70+). Always zoom to 100% after applying, check if the skin looks natural, and pull the sliders back if it starts looking plastic or waxy. The mask gives you full control - paint at lower Flow (30-40%) on areas that need less smoothing.
The key principle: smooth the skin on a mask, not destructively. This way you can always reduce the intensity later.
Step 3: Dodge & Burn (Contouring the Face)
Goal: Sculpt the face with light and shadow to create 3D depth
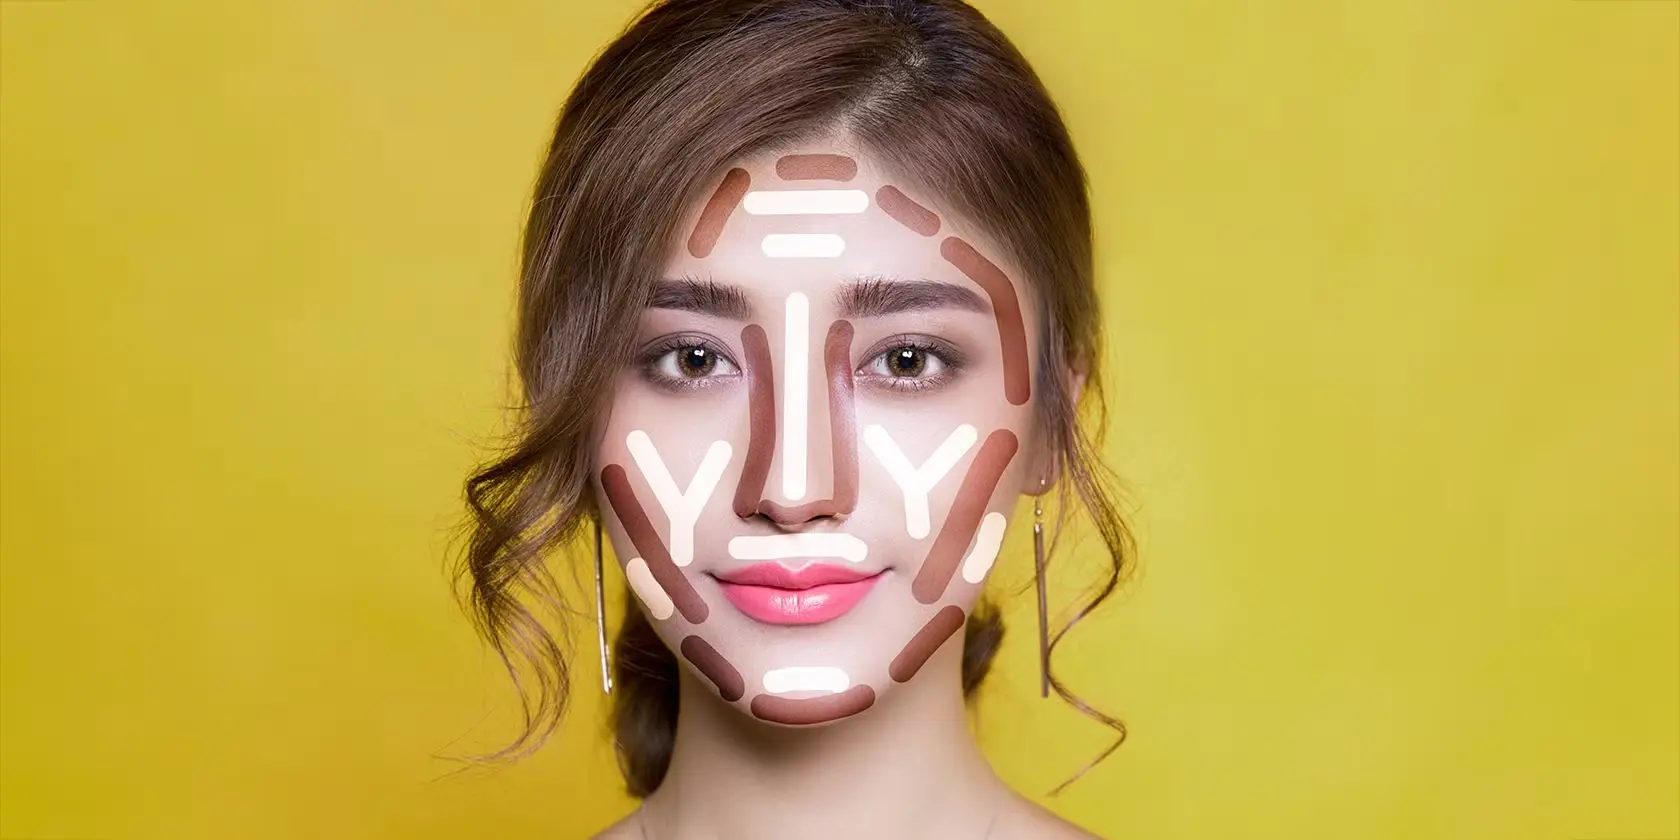 Step 3: The dodge (bright) and burn (dark) zones on a face - this is where 3D magic happens
Dodge and burn is the single most impactful technique in thumbnail retouching. It’s how MrBeast’s designers make faces “pop” even at tiny sizes.
3.1 Run the Touhfa Dodge and Burn Action
Click Play on “Touhfa Dodge and Burn.” This creates:
- A Curves layer with highlights boosted (for dodging)
- A Curves layer with shadows deepened (for burning)
- Both with inverted black masks - nothing is visible until you paint
3.2 Manual Setup (Without Action)
- Create a Curves Adjustment Layer > Pull midtones UP (brighten)
- Invert the mask (Ctrl + I)
- Duplicate, pull midtones DOWN (darken) in the second one
- Invert that mask too
3.3 Dodging (Brightening)
Select the bright Curves layer mask. Use a soft white brush at 3-5% flow and slowly build up brightness on:
| Area | Why |
|---|---|
| Bridge of nose | Creates centerline that draws eye |
| Forehead center | Simulates overhead lighting |
| Top of cheekbones | Defines facial structure |
| Under-eye area | Removes tired/dark circles |
| Chin center | Adds dimension |
| Upper lip | Catches light naturally |
| Top of hair | Creates volume and sheen |
3.4 Burning (Darkening)
Select the dark Curves layer mask. Same brush settings (3-5% flow):
| Area | Why |
|---|---|
| Both sides of nose | Creates nose shadow, draws focus to center |
| Outer cheeks | Contours jaw and slims face |
| Jawline edges | Defines jaw shape |
| Temples | Adds depth around eyes |
| Under chin/neck | Separates face from body |
| Eyebrows | Stronger brows = more intense expression |
| Facial hair | Increases contrast with skin |
3.5 Opacity Adjustment
After painting, set each Curves layer to 60-75% opacity. The effect should be noticeable but not obvious.
The dodge and burn alone transforms a flat photo into a 3D-feeling face. It’s the technique that separates amateur thumbnails from professional ones.
Step 4: Eyes & Teeth Whitening
Goal: Bright, attention-grabbing eyes and teeth that signal energy
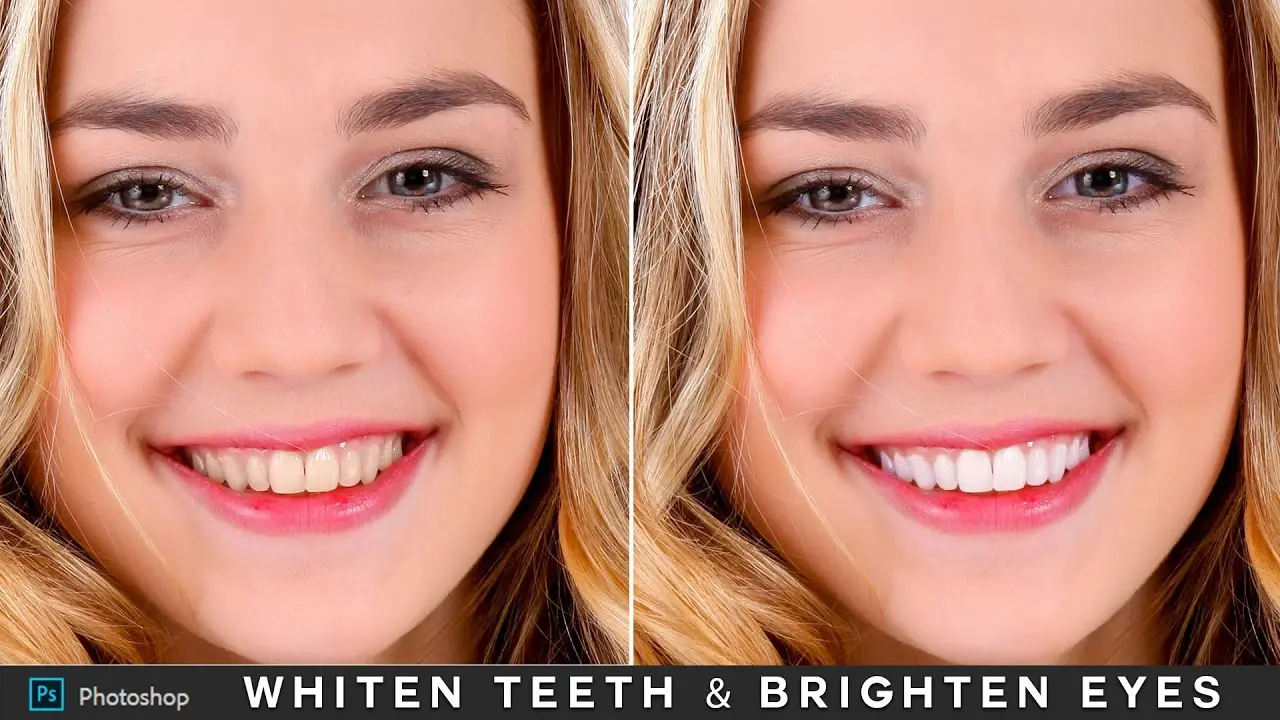 Step 4: Eyes and teeth are pushed to near-white for maximum screen impact
This is what makes MrBeast faces look “superhuman” - the eyes and teeth are pushed beyond natural levels for maximum visibility on small screens.
4.1 Run the Eyes & Teeth Whitening Action
Click Play on “Eyes & Teeth Whitening.” This creates:
- A Hue/Saturation layer (desaturation)
- A Curves layer (brightening)
- Both with inverted masks ready for painting
4.2 Manual Method
Teeth whitening:
- Create Hue/Saturation Adjustment Layer
- Select Yellows in the dropdown
- Move Saturation to -80 (removes yellow stains)
- Invert the mask
- Paint with white brush over teeth only
Then:
- Create a Curves Adjustment Layer
- Pull midtones UP (brighten by ~25%)
- Invert the mask
- Paint over teeth
Eye whitening:
- Create another Hue/Saturation layer
- Set Saturation to -100, Lightness to +25
- Invert mask, paint over the sclera (whites of eyes)
- Do NOT paint over the iris or pupils
- Change blending mode to Color at 50-65% opacity
Eye enhancement:
- Duplicate the eye whitening layer
- Change blending mode to Soft Light at 30-40% opacity
- Remove teeth from this mask (eyes only)
Iris brightening (optional):
- Create a Curves layer, boost brightness
- Paint only over the bottom half of the iris
- This mimics natural overhead lighting hitting the eye
[!TIP] When whitening teeth, use a zoomed-in view and be precise. Painting over the gums or lips will make them look gray and unnatural. Keep brush opacity low (10-20%) and build up gradually.
Step 5: Skin Tone & Color Correction
Goal: Warm, vibrant skin that pops against any background
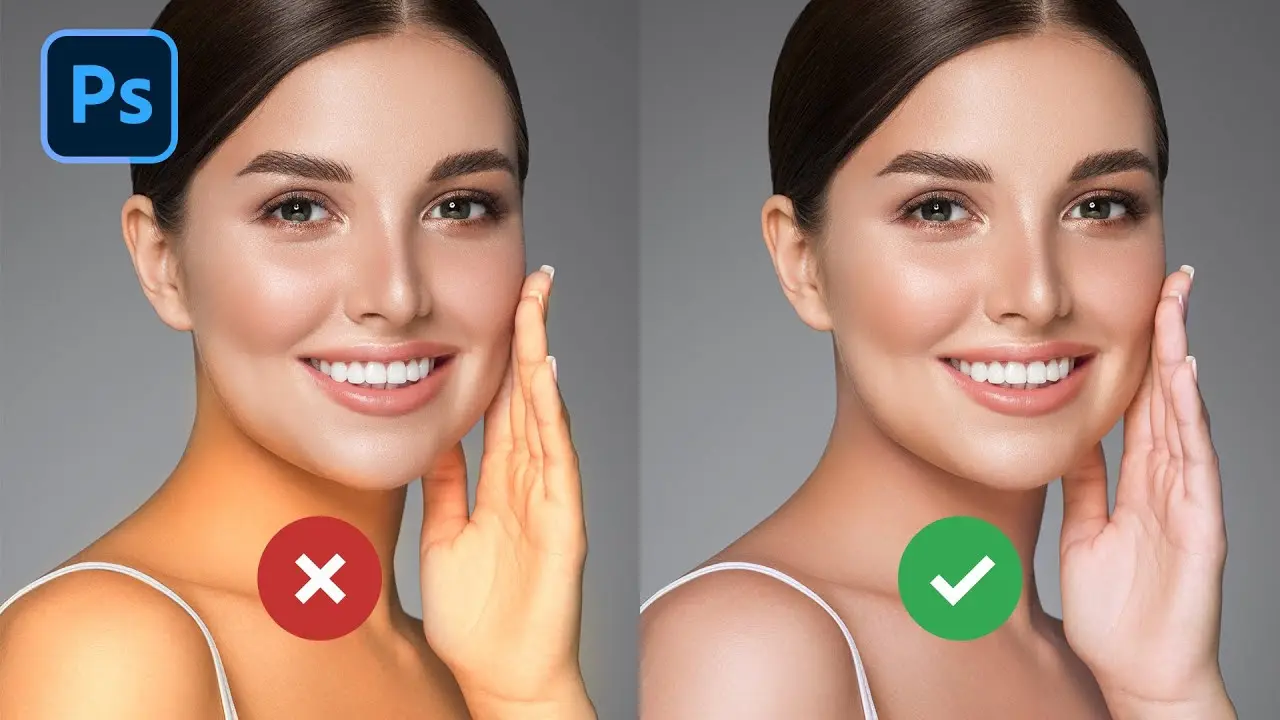 Step 5: Selective Color shifts skin from neutral to warm orange/pink
MrBeast faces are never pale or gray. They shift between warm orange and pink depending on the thumbnail - but they’re always saturated and alive.
5.1 Run the Color Correction Action
Click Play on “Color Correction.” This creates the necessary Selective Color and Color Balance layers.
5.2 Selective Color Adjustment
Create a Selective Color Adjustment Layer and adjust:
First Selective Color layer (Pink push):
| Color Channel | Cyan | Magenta | Yellow | Black |
|---|---|---|---|---|
| Reds | 0 | +15 | 0 | 0 |
| Yellows | 0 | +10 | +5 | 0 |
Second Selective Color layer (Warm push - duplicate and reset):
| Color Channel | Cyan | Magenta | Yellow | Black |
|---|---|---|---|---|
| Reds | 0 | 0 | +20 | 0 |
5.3 Color Balance Fine-Tuning
Create a Color Balance Adjustment Layer:
| Tonal Range | Red/Cyan | Green/Magenta | Blue/Yellow |
|---|---|---|---|
| Highlights | +2 | +2 | -2 |
| Midtones | 0 | 0 | -2 |
| Shadows | -3 | 0 | +3 |
5.4 Fix Red Spots
If there are overly red areas (common around the nose, forehead, or ears):
- Create another Selective Color layer
- Select Reds
- Move Cyan slider +15 to +25 (reduces redness)
- Invert the mask
- Paint only over the red spots
5.5 Run Rich Tone Action (Optional)
The “Rich Tone” action adds depth to the overall tonal range, making the face feel more dimensional after all the color work.
Step 6: Final Polish (Sharpen + Edge Highlight + Export)
Goal: Razor-sharp details where they matter + the signature MrBeast “rim light”
6.1 Merge and Sharpen
- Select all layers and merge to a new layer (
Ctrl + Alt + Shift + E) - Convert to Smart Object
- Run the Sharpen action, or manually: Filter > Camera Raw Filter:
- Texture: +20 to +30
- Sharpening: 40-60, Radius 1.0, Detail 25
- Create a mask, invert it
- Paint sharpening only on: eyes, eyebrows, lips, teeth, beard/facial hair
- Do NOT sharpen smooth skin areas
6.2 Run Unsharpen Face Mask + Unsharpen Eyes and Lips Mask
These two actions selectively ensure:
- The face remains smooth where you smoothed it
- The eyes and lips retain maximum crispness
6.3 Add the Edge Highlight (Rim Light)
This is the finishing touch that gives the “sticker” effect:
- Create a Hue/Saturation Adjustment Layer
- Check Colorize
- Set to pure white (Lightness: +100)
- Invert the mask
- Use a soft brush at 15-20% flow
- Paint along the edges of the face - follow the jawline, cheekbone outline, and top of the hair
- Reduce layer opacity to 25-40% for a subtle effect
In MrBeast thumbnails, the rim light color depends on the background. Use white for neutral backgrounds, or match the background’s dominant color for a cinematic feel.
6.4 Final Contrast Boost
- Create a Curves Adjustment Layer
- Create an S-curve: Pull shadows down slightly, highlights up slightly
- Clip it to the subject layer
6.5 Export
- File > Export > Save for Web
- Format: JPEG, Quality: 80-85%
- Resolution: 1280x720 (16:9)
- Target file size: 400KB - 800KB
Before You Start: Important Notes
[!IMPORTANT] There is no fixed order. The steps above are numbered for teaching clarity, but in practice you can execute them in any sequence that suits your workflow. Many professional retouchers start with dodge and burn before smoothing the skin, while others handle color correction first and adjust smoothing last. The order does not affect the final result - the layers are independent.
[!IMPORTANT] Not all steps are required. The two essential techniques that define the MrBeast face look are skin smoothing (Step 2) and dodge and burn (Step 3). These two alone transform a flat photo into a clean, 3D-sculpted face. The remaining steps - eyes/teeth whitening, color correction, rim light, and sharpening - are optional enhancements that you add based on what the specific photo needs. Some photos arrive with perfect teeth and bright eyes straight from camera. Skip what doesn’t need fixing.
[!CAUTION] Do not over-smooth the face. This is the most common mistake. MrBeast’s team does not blur the face into a plastic, AI-generated look. The retouched face must still look like the original person - the same bone structure, the same proportions, the same recognizable features. The goal is to clean the skin and enhance contrast, not to transform the person into a wax figure. If your result no longer resembles the original photo, you have gone too far. Pull the smoothing opacity back to 50-60%, reduce the dodge and burn intensity, and compare constantly with the original layer by toggling visibility on and off.
Complete Layer Stack Reference
After completing all 6 steps, your Layers panel should look like this (top to bottom):
📋 Layer Stack (Top → Bottom)
│
├── 🔒 Final Merged (Smart Object) + Sharpen mask
├── 📊 S-Curve Contrast (Curves, clipped)
├── 💡 Edge Highlight / Rim Light (Hue/Sat, masked)
├── 🎨 Color Balance (Highlights/Midtones/Shadows)
├── 🟠 Selective Color #2 (Warm/Yellow push)
├── 🔴 Selective Color #1 (Pink push)
├── 🔧 Red Spot Fix (Selective Color, masked)
├── 👁️ Eye Enhancement (Soft Light, masked)
├── 👁️ Eye Whitening (Hue/Sat + Curves, masked)
├── 🦷 Teeth Whitening (Hue/Sat + Curves, masked)
├── ☀️ Dodge Layer (Curves UP, inverted mask)
├── 🌑 Burn Layer (Curves DOWN, inverted mask)
├── 📷 Smoothing Pass (Smart Object + Camera Raw, masked)
├── 🔝 High Frequency (Linear Light)
├── 🔽 Low Frequency (painted/blurred)
├── 🧑 Original Subject (with layer mask)
└── ⬛ Background (placeholder)
Before & After: The 6-Step Transformation
| Step | What Happens | Visual Change |
|---|---|---|
| Step 1 | Remove background + Camera Raw | Dark, uneven photo becomes bright, warm, and even |
| Step 2 | Frequency Separation + smoothing | All blemishes, pores, and texture disappear from skin |
| Step 3 | Dodge & Burn | Flat face becomes 3D, with sculpted cheekbones and defined jawline |
| Step 4 | Eyes & Teeth whitening | Eyes glow, teeth are pure white - face becomes “magnetic” |
| Step 5 | Color correction | Skin shifts from neutral to warm orange/pink - alive and vibrant |
| Step 6 | Sharpen + rim light + export | Razor-sharp details on eyes/hair, “sticker” edge glow, ready for thumbnail |
Pro Tips from MrBeast’s Design Team
The “Less is More” Rule
MrBeast’s lead designer Chucky Appleby has emphasized that the biggest mistake is over-processing. The face should look enhanced, not fake. Key rules:
- Dodge & Burn flow never above 5%. Build up slowly
- Skin smoothing opacity: 60-75%, never 100%
- Teeth whitening: stop before they look like veneers
- Eye whitening: the iris color should still be visible and natural
The Mobile Test
After every edit, resize your canvas to 168x94 pixels (actual YouTube mobile thumbnail size). If the face doesn’t instantly read as a human expression at this size, increase the dodging on eyes and mouth.
Speed Workflow with the Touhfa Bundle
With the Touhfa Action Bundle installed, the complete workflow takes 15-25 minutes instead of 45-60 minutes:
| Without Actions | With Touhfa Actions |
|---|---|
| Manually create 12+ layers | One-click setup per step |
| Remember blending modes | Pre-configured correctly |
| Trial-and-error mask setup | Inverted masks ready to paint |
| 45-60 min total | 15-25 min total |
MrBeast Style vs. Realistic Style: When to Use Each
Not every channel should use the MrBeast “cartoon clean” style. Here’s a decision framework:
| MrBeast Style (Hyper-Smooth) | Realistic Style (Raw Pop) |
|---|---|
| Challenge, stunt, and entertainment channels | Documentary, commentary, and news channels |
| Younger audience (13-24) | Mature audience (25+) |
| High-energy, fast-paced content | Story-driven, authentic content |
| Maximum CTR on trending topics | Trust-building for long-term retention |
| Skin smoothing at 80-100% | Skin smoothing at 30-40% |
| Eyes and teeth pushed to white | Natural eye/teeth brightness |
| Saturated warm skin tones | Realistic skin tones with texture |
For the realistic alternative, skip the heavy skin smoothing (Step 2) and reduce dodge & burn intensity to 30-40% opacity. Keep eyes and teeth at natural brightness levels.
Frequently Asked Questions
How do I get the MrBeast face effect in Photoshop?
The MrBeast face effect uses a 6-step workflow: background removal, Camera Raw brightening, frequency separation skin smoothing, dodge & burn contouring, eyes/teeth whitening, and color correction with warm orange/pink tones. Download the free Touhfa Photoshop Action Bundle to automate the layer setup for each step.
What makes MrBeast thumbnail faces look so clean?
MrBeast’s team uses frequency separation to remove skin texture while keeping edges sharp, combined with dodge & burn to sculpt highlights and shadows. The eyes and teeth are pushed to near-white using Hue/Saturation layers, and the skin tone is shifted warm using Selective Color adjustments.
Is the Touhfa Photoshop Action Bundle free?
Yes. The Touhfa Photoshop Action Bundle is our 100% free gift to the community. It includes 10+ actions for face retouching: Frequency Separation, Dodge & Burn, Eyes & Teeth Whitening, Color Correction, Sharpen, Noise Reduction, Rich Tone, and Unsharpen masks. Download the .atn file, load it into Photoshop, and start retouching.
How long does MrBeast face retouching take?
With the Touhfa Action Bundle, the complete 6-step face retouch takes 15-25 minutes. Without pre-built actions, expect 45-60 minutes of manual layer creation and adjustment.
Can I use this technique on any face photo?
Yes, but results depend on photo quality. Start with a well-lit, high-resolution photo (at least 1080p). Low-resolution or poorly lit photos will require more work in Step 1 (Camera Raw) and may not achieve the same level of smoothness.
What’s the difference between dodge and burn?
Dodging brightens areas (highlights on nose, cheekbones, forehead) to simulate light hitting the face. Burning darkens areas (jawline edges, nose sides, temples) to add shadow and depth. Together, they create a 3D-sculpted look that makes faces pop at any size.
What is the MrBeast surprised face / sigma face / shocked face?
These refer to the three main expressions MrBeast uses in thumbnails. The surprised face features wide eyes and an open mouth, used for giveaway and shocking-amount thumbnails. The sigma face is an intense, direct stare with a slight frown, used for challenge and competition content. The shocked face is an exaggerated disbelief expression used for record or unexpected outcome videos. All three use the same Photoshop retouching workflow described in this guide - the difference is purely in the source photo selected before editing begins.
How do I get a MrBeast face PNG (transparent background)?
Use Photoshop’s Remove Background button (Properties panel) or the Select Subject tool to isolate the face from its background. For higher precision, use the Pen Tool to trace the edges manually. Once isolated, export as PNG-24 with transparency enabled. Step 1 of this guide covers the full background removal process.
Related guides: