YouTube Upload Settings: Every Option Explained with Clear Recommendations (2026)
The YouTube upload page is the control room that determines the algorithmic trajectory and financial future of every video before it reaches a single viewer. In 2026’s competitive landscape, content quality alone is not enough — the metadata and technical infrastructure of your video is the direct language you use to communicate with search engines and recommendation systems.
The upload interface contains over 30 precise settings and technical options, spanning search engine optimization (SEO), strict legal compliance, and complex monetization algorithms. Despite their critical importance, the vast majority of creators either ignore most of these settings or blindly accept the defaults — wasting enormous organic growth opportunities and potential revenue.
This guide takes you through every single setting, one by one, with a clear, data-backed recommendation for each: do this / don’t do this.
→ This article is part of our comprehensive upload framework. For the big-picture strategy, start here: How to Upload Videos to YouTube the Right Way (2026 Guide).
Tab 1: Details — The Core Metadata Settings

The Details tab is the foundation of your video’s descriptive identity. YouTube’s Natural Language Processing (NLP) algorithms rely exclusively on these fields at first to understand your video’s context, classify it, and determine the target audience segment.
Title: Under 70 Characters — The Technical Reason
The title is the single most influential element in determining your Click-Through Rate (CTR). While YouTube technically allows up to 100 characters, modern algorithms and mobile device behavior impose much tighter constraints.
Titles exceeding 70 characters get visually truncated on most smartphone screens — the final words are replaced with ”…” which often hides the most critical part of the message and kills click motivation. Beyond display issues, YouTube’s crawlers assign semantic weight based on word position, giving the highest indexing priority to the opening words.
| Practice | Recommendation | Why |
|---|---|---|
| Keyword placement | ✅ DO: Primary keyword in the first 3 words | Search engines assign higher semantic weight to front-loaded words, accelerating your video’s match with search queries. |
| Curiosity framing | ✅ DO: Create curiosity for algorithm-driven content | Leveraging the “Curiosity Gap” — telling the viewer what will happen while leaving how for the video — boosts performance in Suggested Videos. |
| Title-description duplication | ❌ DON’T: Repeat the title verbatim in the description | The system classifies this as low-value keyword stuffing, weakening contextual signals without adding any new semantic density. |
Description and Upload Defaults
The description field offers up to 5,000 characters — a massive space designed to expand the semantic web of your video. YouTube’s search engine scans this text meticulously to identify secondary keywords and synonyms (LSI Keywords) that the concise title couldn’t accommodate.
Professionals rely on Upload Defaults to standardize their channel’s text identity and save time consumed by routine operations. This feature locks in fixed texts (social media links, legal disclaimers, affiliate disclosures, contact information) that appear automatically in every new upload — freeing you to focus on crafting the custom description for the current video.
Pay special attention to the first 150 characters of the description. This is the visible portion before the viewer clicks “Show More” — and it’s the text snippet that appears in YouTube and Google search results.
| Practice | Recommendation | Why |
|---|---|---|
| Text automation | ✅ DO: Use Upload Defaults to save time | Reduces human error in forgetting important links and ensures consistent conversion funnels across all uploads. |
| Snippet optimization | ✅ DO: First 150 chars = keyword + clear value | These characters are the effective “meta description” of your video. Including the keyword here with an explicit value promise raises CTR. |
| Link dumping | ❌ DON’T: Post a wall of links without any written context | Dumping links without narrative context weakens the algorithm’s ability to understand your content and sends negative signals that the description is purely promotional. |
Test & Compare: 3 Truly Different Thumbnails
YouTube’s built-in A/B testing tool allows creators to upload up to 3 thumbnails (and/or titles), distributing them equally across audience segments. The algorithm then measures Share of Watch Time generated by each design and automatically promotes the winner.
In 2026, YouTube also began testing Previews — animated clips that play before the viewer clicks — reducing reliance on misleading thumbnails and rewarding designs that accurately represent the content.
The tool’s statistical engine requires substantial differences in user response to reach a decisive significance level. If the designs are too similar, accuracy drops and the test may take weeks to declare a marginal winner.
| Practice | Recommendation | Why |
|---|---|---|
| Radical design contrast | ✅ DO: One with a face, one text-only, one with a different background concept | Testing fundamentally different visual concepts accelerates the tool’s ability to isolate the variables that attract your audience, delivering clear preference data. |
| Marginal tweaks | ❌ DON’T: Upload 3 nearly identical versions of the same design | Changing a shirt color or font while keeping the same composition confuses the algorithm and produces inconclusive data — the tool’s accuracy drops to ~50% in these cases. Don’t trust it blindly without contrast. |
For a deep dive into thumbnail testing strategy, see our YouTube Thumbnail A/B Testing Guide. For proven design techniques, read our High CTR Thumbnails Guide.
Playlist: Assign It Before Publishing — Not After
Playlists are not just organizational tools — they are semantic silos that tell YouTube’s algorithm a specific group of videos is thematically connected, forming a block of “Topical Authority.”
| Practice | Recommendation | Why |
|---|---|---|
| Pre-publish assignment | ✅ DO: Select the playlist before hitting Public | The video passes through an Initial Indexing Window the moment it’s published. Embedding it in a playlist beforehand provides immediate context, pushing the algorithm to suggest it alongside sibling videos from the first minutes and encouraging binge-watching. |
Made for Kids: A Legal Obligation
The “Made for Kids” checkbox is a strict legal obligation enforced by the FTC under the Children’s Online Privacy Protection Act (COPPA). The distinction does not depend on how “clean” or “family-friendly” your content is — it depends exclusively on the Intended Audience.
To simplify this complex legal standard, apply the Peppa Pig vs. Marvel Rule:
- Peppa Pig = Educational cartoons, nursery songs, or content primarily designed for children under 13 → Made for Kids
- Marvel = Superhero content with complex themes, violence, or satirical dialogue targeting teens and adults → Not Made for Kids (even though children watch it)
YouTube evaluates seven legal factors including: video subject, presence of child actors, language used, and presence of characters or toys that attract children.
| Practice | Recommendation | Why |
|---|---|---|
| Honest classification | ✅ DO: Answer truthfully — this protects you from FTC fines and YouTube penalties | Falsely marking adult content as “Made for Kids” instantly destroys revenue (no personalized ads), disables comments, and kills the mini-player. Falsely avoiding the label for children’s content exposes your channel to harsh FTC legal action. |
Altered Content: When to Choose Yes
With the explosive growth of generative AI tools, YouTube enacted a strict transparency policy in 2026 requiring creators to disclose Altered or Synthetic Content.
- ✅ DO choose Yes exclusively when: your video uses deepfakes of real people, AI voice cloning of a real person, or manipulates real event footage to mislead viewers into thinking it’s authentic.
- ❌ DON’T choose Yes for: using AI to help write scripts, color correction, noise removal, or simple fantasy animations. Choosing Yes does not reduce organic reach or affect monetization — YouTube officially confirms this. But failing to disclose when required risks video deletion and YPP suspension.
Automatic Chapters: Turn Them Off and Do It Manually
Chapters are a powerful feature for improving user experience and boosting retention. In 2026, chapter titles are indexed by Google as Key Moments directly in search results — meaning a single well-titled chapter can drive massive organic traffic even if the full video doesn’t rank.
YouTube offers AI-powered automatic chapters, but they lack any marketing intelligence.
| Practice | Recommendation | Why |
|---|---|---|
| Manual timestamps | ✅ DO: Write timestamps in the description manually (e.g., 0:00 Introduction, 2:30 The Strategy) | Manual control lets you embed strategic keywords into chapter titles, ensuring Google indexes them as direct answers to user queries (Zero-click searches). |
| Auto-generated chapters | ❌ DON’T: The AI produces meaningless chapters like “Discussion” and “Continuation” | Auto-chapters typically split the video based on silence gaps and generate vague titles that provide zero value to search engines — completely wasting the SEO power of this tool. |
Quick Settings Reference Table
These secondary settings at the bottom of the Details tab deserve conscious attention:
| Setting | Recommendation | Note |
|---|---|---|
| Notify Subscribers | ✅ Enable | Your first defense for gathering early views. Disable only if the video drastically deviates from your usual niche to avoid negative CTR from uninterested subscribers. |
| Allow Embedding | ✅ Enable | Free marketing when external websites embed your video, generating backlinks that boost authority. |
| Shorts Remixing | ✅ Allow | Letting users clip your video into Shorts creates viral distribution and automatic referral links to the original. |
| Comments | ✅ Basic Moderation | Sufficient for filtering spam and profanity without choking the organic discussions that fuel the algorithm. |
| Category | Pick the closest | Don’t overthink it — YouTube’s 2026 algorithms rely 99% on actual video content and user behavior, not this manual selection. |
| Language | Select the spoken language | Accurately identifying the spoken language dramatically improves auto-caption quality, which enhances indexing. |
Tab 2: Monetization — Revenue Strategy
This tab isn’t just about money — it’s deeply connected to how YouTube evaluates and distributes your content. Ads are the platform’s economic lifeblood, and understanding their mechanics ensures a strategic balance between maximum revenue and an experience that doesn’t drive viewers away.
Turning Ads On: Why You Always Should
Some creators turn off ads thinking it improves the viewer experience and might boost reach.
The Reality: YouTube’s terms of service allow the platform to display ads on videos even if the creator isn’t in the YouTube Partner Program (YPP) or has manually disabled monetization. The viewer will see ads regardless. Disabling this option simply means YouTube keeps 100% of the revenue instead of sharing it with you.
✅ Recommendation: Always turn Monetization ON. Take your share.
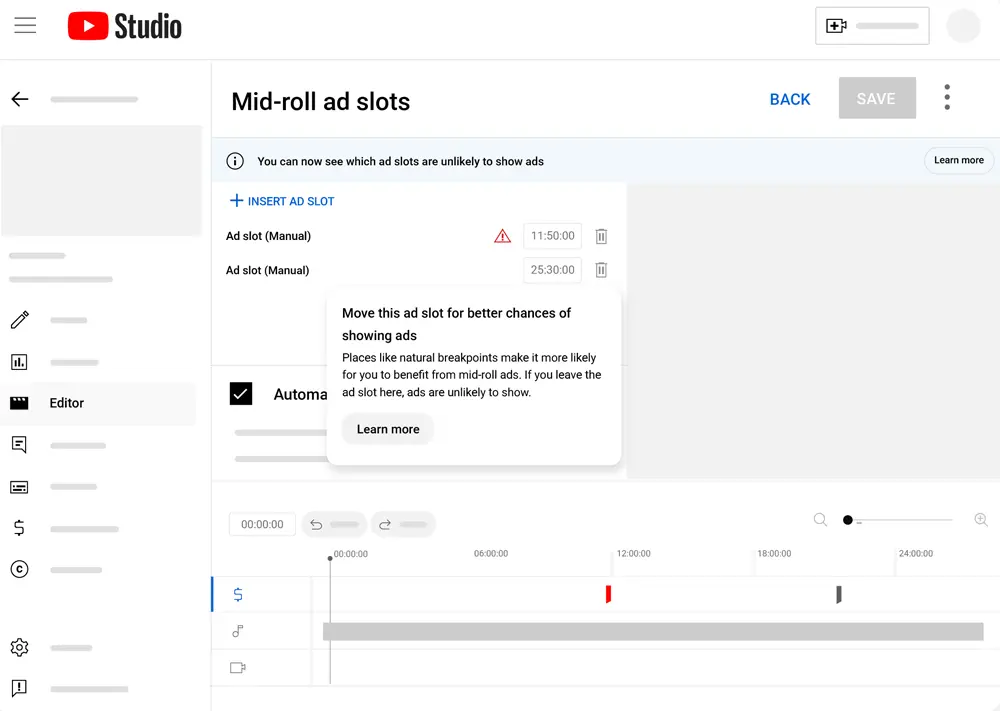
Mid-roll Ads: The Revenue-Retention Balance
Videos exceeding 8 minutes qualify for mid-roll ads (ads that interrupt playback). This is a double-edged sword — capable of dramatically multiplying your RPM (Revenue Per Mille), but also capable of destroying Retention Rate if used greedily.
- ✅ DO: Let YouTube place them automatically (Automatic Placement). YouTube’s machine learning identifies natural break points — scene transitions, long pauses — and inserts ads without disrupting the flow of ideas or breaking attention peaks.
- ❌ DON’T: Manually stuff ads every 2 minutes trying to maximize profit. Excessive stuffing frustrates viewers and causes immediate exits. The sharp drop in retention sends a red-flag Negative Signal to the recommendation algorithm, halting distribution to wider audiences. The viewership losses far outweigh any marginal ad revenue gained.
Ad Suitability: Honesty Protects You
YPP members must complete the Ad Suitability Self-Certification questionnaire, rating their video for profanity, violence, adult content, and sensitive topics.
YouTube operates a Trust Score system. When your self-ratings consistently match the platform’s automated AI scans, your account’s reliability rises — earning faster approval and instant green-light monetization on future uploads. Consistently lying or attempting to hide unsuitable content collapses your Trust Score, triggering long-term manual reviews, retroactive demonetization, and strategic losses far worse than one video’s reduced earnings.
✅ Recommendation: Be absolutely honest. YouTube’s AI scans the video regardless of what you click.
Tab 3: Video Elements — Session Engineering
This tab shifts from classifying the video to engineering the interactive session. Keeping viewers inside YouTube’s ecosystem and moving them from one video to the next is the most important metric the platform rewards — Total Session Time.
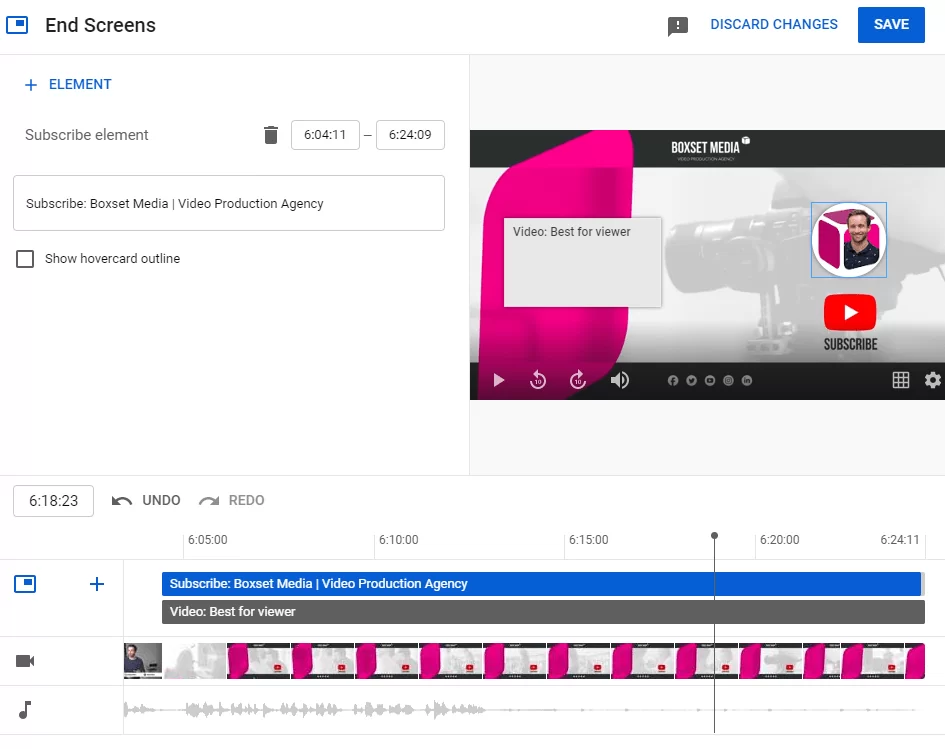
End Screen: One Element in the Center
End screens appear in the last 5 to 20 seconds of the video. They are the most important technical bridge for converting a one-time viewer into a binge viewer.
- ✅ DO: Display one element in the center — either “Best for Viewer” (letting YouTube’s algorithm serve the most compatible video based on the user’s watch history) or a specific video you verbally promote in the outro. Set the duration to 5-10 seconds, enough for the viewer to respond without dragging the outro.
- ❌ DON’T: Add the full package (Subscribe + Playlist + Video + External Link) simultaneously. This visual clutter triggers “Decision Fatigue” — the viewer becomes analytically paralyzed by too many choices, closes the tab, and leaves the platform without clicking anything.
Cards: Use Sparingly
Cards are sliding text notifications that appear in the upper corner during playback. Unlike end screens which guide viewers after the video, cards are interruptive elements that pull attention away from the current content.
- ❌ DON’T use them excessively. Placing cards randomly in the first half of the video is retention suicide — you’re literally suggesting the viewer leave before the algorithm has gathered enough data to evaluate.
- ✅ DO use them only when you verbally reference detailed content on another topic that you can’t fully cover in the current video.
Subtitles: Let YouTube Generate, Then Review
Captions are one of the most powerful hidden SEO factors. Search engines can’t “hear” audio — they rely entirely on text crawling to index content.
- ✅ DO: Let YouTube auto-generate the captions as a base, then manually review and correct specialized terms, proper nouns, and brand names. This correction dramatically improves Google’s keyword indexing accuracy for the precise words spoken in your video, opening the door to appearing in virtually infinite search results.
Tab 4: Visibility — The Most Important Step
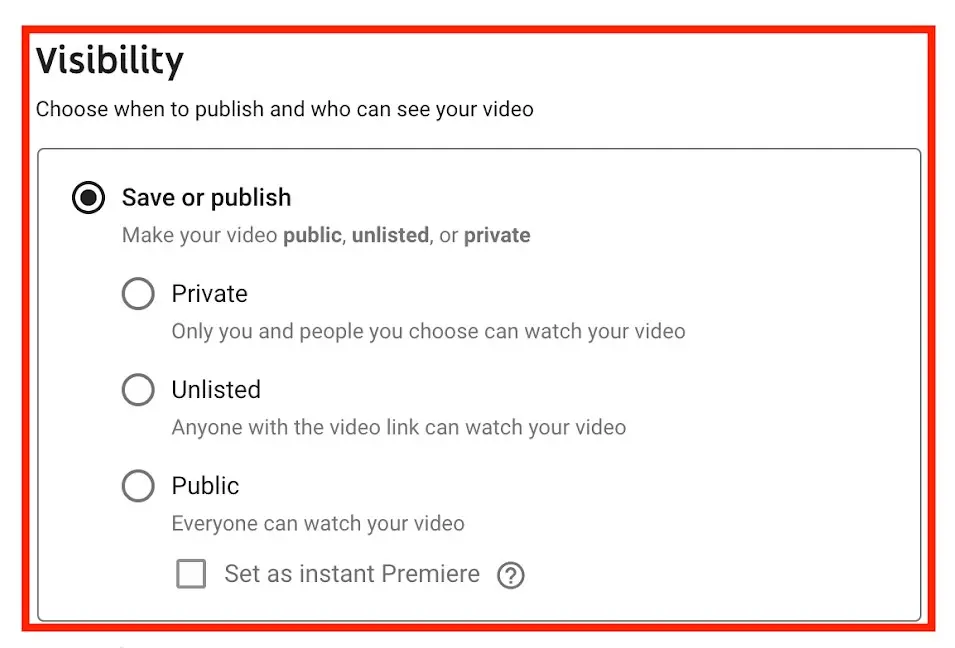
The Visibility tab is the most critical procedural step in the entire upload process. It determines the timing and manner in which the world first interacts with your content. Impulsively pressing “Public” the moment the upload bar hits 100% is one of the biggest strategic mistakes that destroys launch momentum.
The Golden Rule: Always Start Unlisted
Professional publishing requires tactical patience.
- ✅ DO: Set the video to Unlisted first. Give it at least 2 hours before going public.
- The Technical Mechanism: After the upload bar reaches 100%, the video enters multiple background processing stages. YouTube processes low resolution (SD) first to make the file available quickly. If you publish immediately, your most loyal subscribers (who determine the critical initial CTR) will be greeted by terrible visual quality — reducing satisfaction and triggering early exits. The 2-hour wait allows YouTube’s servers to process HD and 4K versions using advanced codecs (VP9 and AV1) that take longer. It also gives Content ID systems time to run copyright checks and ad suitability scans — preventing surprise demonetization after thousands of views.
- ❌ DON’T: Publish under emotional schedule pressure. Never sacrifice this buffer.
Private vs. Unlisted: The Practical Difference
| Mode | Who Can See It | Best Use Case |
|---|---|---|
| Private | Only you (and email-invited accounts) — no link sharing possible | Personal archiving of old videos you want to hide without deleting. |
| Unlisted | Anyone with the direct link — doesn’t appear in search or on your channel | Professional daily use: sending to sponsors for pre-approval, sharing with team members for editorial review, reviewing on your phone before launch. |
Schedule: How to Time It Smartly
Scheduling ensures consistent publishing without requiring the creator to be physically present at the moment of launch.
- ✅ DO: Navigate to YouTube Studio → Audience → When your viewers are on YouTube and find the darkest purple blocks (peak traffic hours).
- ✅ DO: Schedule your video 1 hour before your audience’s peak. This proactive timing gives the algorithm enough time to index the video and position it in the Suggested section, ready to greet viewers as the traffic surge begins.
- ✅ DO: Set a personal reminder to reply to comments the moment the video goes live. Creator engagement in the first 30 minutes doubles the strength of organic Velocity Signals.
Premiere: When Is It Worth Using?
Premiere combines the advantages of live streaming (gathering an audience in real-time for live chat) with the reliability of pre-recorded content (high production quality).
- ✅ DO: Reserve it for exceptional content — documentary launches that took months to produce, major product announcements, or large-scale collaborations with other creators.
- ❌ DON’T: Use it for routine daily uploads. Overuse causes “Desensitization” among subscribers, training them to ignore your notifications entirely in the future.
Export Settings Before Uploading
YouTube performance is inseparable from the phase that precedes the upload — your video editor’s export/render settings. Wrong export settings produce either visually degraded quality after YouTube’s compression or astronomically large files that increase upload failure risk without any visual benefit.
The Optimal Format: MP4, H.264
YouTube’s official recommendation is the MP4 container with H.264 video codec. This combination offers an exceptional balance between reasonable file size and coherent image quality — the safest, most reliable choice for stable uploads and error-free processing.
Resolution: 1080p Is Enough for Most Content
YouTube applies aggressive compression to 1080p uploads, allocating relatively low bitrates to save storage space. However, 1080p remains sufficient for informational content, tutorials, vlogs, and talking-head videos — viewers rarely notice the difference on mobile screens.
Strategic exception: Reserve 4K for visually rich content only (cinematic nature footage, camera reviews, high-end gaming) where the higher resolution forces YouTube to activate superior codecs (AV1, VP9) that prevent edge pixelation.
Frame Rate: Keep It Native
- ✅ DO: Export at the same frame rate you shot in. If you filmed at 30fps, export at 30fps.
- ❌ DON’T: Force 30fps footage into a 60fps export (upsampling). The editing software simply duplicates existing frames without creating smoother motion — doubling file size for zero actual quality improvement.
iMovie Users: Choose “High” — Not “Best (ProRes)”
When exporting from iMovie or Final Cut Pro on Mac, avoid the “Best (ProRes)” quality setting.
| Setting | File Size (55-second video) | Upload Time | YouTube Quality |
|---|---|---|---|
| Best (ProRes) | ~3.3 GB | ~1 hour | Identical after YouTube re-compression |
| High | ~205 MB | ~5 minutes | Identical after YouTube re-compression |
ProRes is an intermediate uncompressed codec designed for transferring files between professional editing suites — not for final delivery to YouTube. The visual result after YouTube’s re-compression is identical, making the bandwidth and time expenditure completely pointless.
3 Practical Tips for Faster Uploads
- Ethernet cable > Wi-Fi: A direct wired connection prevents packet loss and fluctuations that wireless networks suffer from.
- Disconnect other devices from Wi-Fi: Prevent bandwidth congestion from phones and smart TVs sharing the same router — dedicating full upload speed to your computer.
- Don’t stream content during upload: Consuming download bandwidth for browsing or streaming music weakens your upload channel and dramatically extends upload duration.
Conclusion
Managing YouTube’s upload interface is the true marriage between art and algorithmic mechanics. If there is one setting that creates the single biggest structural difference in a video’s trajectory, it is mastering Visibility: committing to the rule of Unlisted → Wait 2 hours → Public.
This strategic patience ensures the video passes through processing filters, ad suitability checks, and maximum resolution encoding — presenting your content to the audience in its best possible technical condition, backed by solid metadata, smart manual chapters, and a distraction-free end screen.
Continue building your channel:
- 📋 Return to the complete upload guide
- ⚙️ YouTube Setup for Beginners: 22 essential channel settings
- 📱 Upload from phone: the correct two-app method
- ▶️ YouTube Shorts: settings and the scroll-stopping Hook secret
- 🎮 Gaming channel upload guide
- 📐 YouTube thumbnail size & specs
- 🔥 High CTR thumbnails: 10 proven tips
- 🧪 A/B test your thumbnails the right way
- 🚀 60 thumbnail tips for 2026
![Your First 10 YouTube Videos: What to Post [2026]](/images/growth/first-youtube-videos/first-videos-plan.webp)
![How Long Does It Take to Get 1000 YouTube Subscribers? [2026 Data]](/images/growth/how-long-to-get-1000-subscribers/1000-subscribers.webp)